UNTZtrument: a Trellis MIDI Instrument
Table of Contents
What's a MIDI?
First Steps
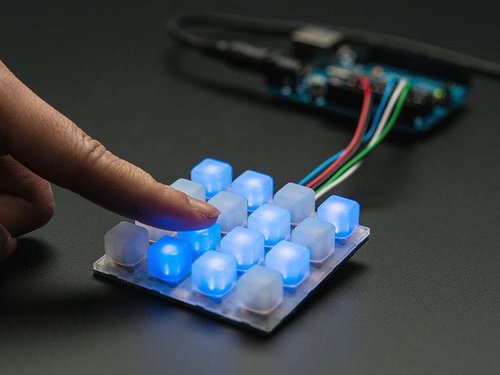 UNTZtrument is based on Adafruit’s Trellis, a 4x4 backlit keypad kit.
 Four Trellises are combined to make a single large 8x8 matrix for UNTZtrument. The HELLA UNTZtrument has eight Trellises in a 16x8 matrix!
Normally you have to buy three separate parts for each Trellis (PCB, elastomer keypad and LED pack), but the UNTZtrument kits have everything you need.
We selected white LEDs for the UNTZtrument kits. If you have a large stash of 3mm LEDs in some other color you can certainly use those instead.
You will also need an Arduino Leonardo microcontroller board, either the regular version or the headerless variety if you want permanent connections.
UNTZtrument will not work with the Arduino Uno, Mega or other boards. Must be the Arduino Leonardo, or a 100% compatible board based on the ATmega32U4 microcontroller. Because MIDI.
Arduino Leonardo. Period.
Additionally, you’ll need some wire (22 gauge solid-core wire is ideal, but stranded can work in a pinch), a soldering iron & solder, basic hand tools and a Micro USB cable.
Let’s Get Started!
So, as a first step to building your UNTZtrument kit, work through our introductory Trellis guide first. But with a few important changes:
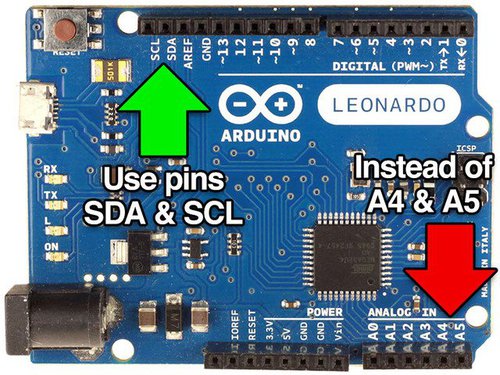 Because UNTZtrument is based around the Arduino Leonardo, it requires slightly different wiring: Use the SDA and SCL pins instead of A4 and A5 as shown in the guide.
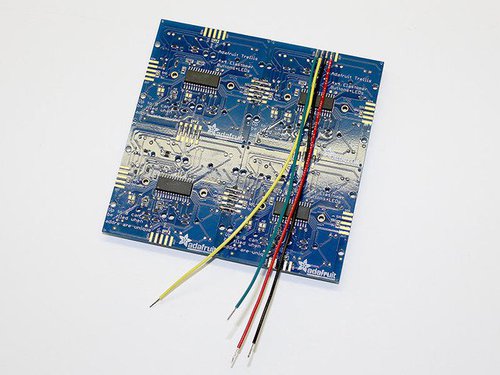 Looking at the back of the tiled Trellis boards…with the text upright, in the normal orientation for reading…connect the wires to the header along the top edge, toward the right. They should be about 6 inches (15 cm) long, or a little longer.
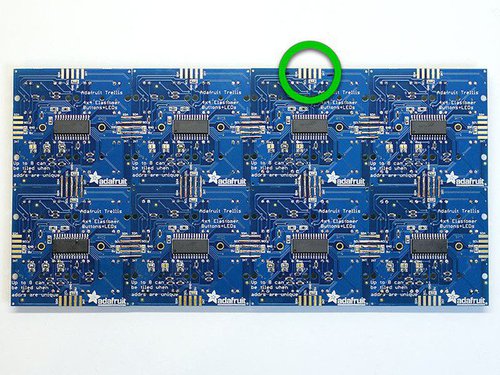 On the HELLA UNTZtrument — a 4x2 assembly of Trellises — connect the wires to the third header along the top edge, not the rightmost fourth header.
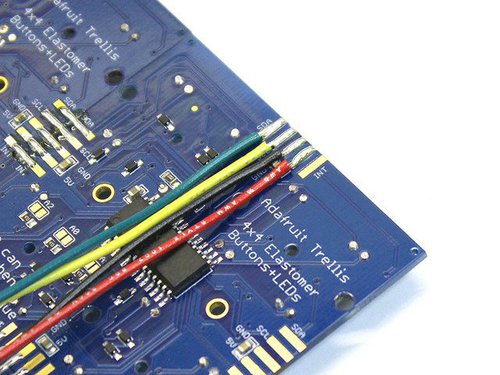 Try pointing the wires “inward” rather than off the edge of the board. This makes it easier to fit in the case.
The INT pin is not used by UNTZtrument and does not need to be connected.
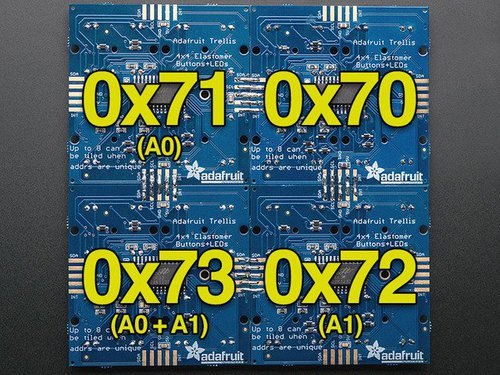 When setting the board addresses (by bridging the solder points on the back), use the values shown here.
Using a different order is not catastrophic, you’ll just need to edit the code to match. Following this standard makes it easier to share code with other UNTZtrument users.
Check the orientation of the boards and use the large Adafruit silkscreen logo to make sure you have them oriented right and the correct addresses set.
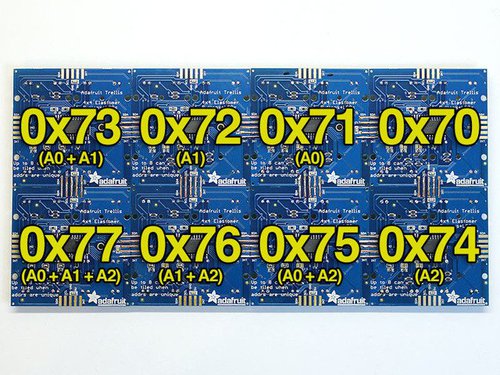 Here’s the address map for the HELLA UNTZtrument.
Programming
For the HELLA UNTZtrument, change NUMTRELLIS to 8.
/***********************************************************
This is a test example for the Adafruit Trellis w/HT16K33.
Reads buttons and sets/clears LEDs in a loop.
"momentary" mode lights only when a button is pressed.
"latching" mode toggles LED on/off when pressed.
4 or 8 matrices can be used. #define NUMTRELLIS to the
number in use.
Designed specifically to work with the Adafruit Trellis
----> https://www.adafruit.com/products/1616
----> https://www.adafruit.com/products/1611
Adafruit invests time and resources providing this
open source code, please support Adafruit and open-source
hardware by purchasing products from Adafruit!
Written by Limor Fried/Ladyada for Adafruit Industries.
MIT license, all text above must be included in any redistribution
***********************************************************/
#include <Wire.h>
#include "Adafruit_Trellis.h"
#define NUMTRELLIS 4 // **** SET # OF TRELLISES HERE
#define MOMENTARY 0
#define LATCHING 1
#define MODE LATCHING // **** SET MODE HERE
Adafruit_Trellis matrix[NUMTRELLIS] = {
Adafruit_Trellis(), Adafruit_Trellis(),
Adafruit_Trellis(), Adafruit_Trellis()
#if NUMTRELLIS > 4
,Adafruit_Trellis(), Adafruit_Trellis(),
Adafruit_Trellis(), Adafruit_Trellis()
#endif
};
Adafruit_TrellisSet trellis = Adafruit_TrellisSet(
&matrix[0], &matrix[1], &matrix[2], &matrix[3]
#if NUMTRELLIS > 4
,&matrix[4], &matrix[5], &matrix[6], &matrix[7]
#endif
);
#define numKeys (NUMTRELLIS * 16)
// Connect Trellis Vin to 5V and Ground to ground.
// Connect I2C SDA pin to your Arduino SDA line.
// Connect I2C SCL pin to your Arduino SCL line.
// All Trellises share the SDA, SCL and INT pin!
// Even 8 tiles use only 3 wires max.
void setup() {
Serial.begin(9600);
Serial.println("Trellis Demo");
// begin() with the addresses of each panel.
// I find it easiest if the addresses are in order.
trellis.begin(
0x70, 0x71, 0x72, 0x73
#if NUMTRELLIS > 4
,0x74, 0x75, 0x76, 0x77
#endif
);
// light up all the LEDs in order
for (uint8_t i=0; i<numKeys; i++) {
trellis.setLED(i);
trellis.writeDisplay();
delay(50);
}
// then turn them off
for (uint8_t i=0; i<numKeys; i++) {
trellis.clrLED(i);
trellis.writeDisplay();
delay(50);
}
}
void loop() {
delay(30); // 30ms delay is required, dont remove me!
if (MODE == MOMENTARY) {
// If a button was just pressed or released...
if (trellis.readSwitches()) {
// go through every button
for (uint8_t i=0; i<numKeys; i++) {
// if it was pressed, turn it on
if (trellis.justPressed(i)) {
Serial.print("v"); Serial.println(i);
trellis.setLED(i);
}
// if it was released, turn it off
if (trellis.justReleased(i)) {
Serial.print("^"); Serial.println(i);
trellis.clrLED(i);
}
}
// tell the trellis to set the LEDs we requested
trellis.writeDisplay();
}
}
if (MODE == LATCHING) {
// If a button was just pressed or released...
if (trellis.readSwitches()) {
// go through every button
for (uint8_t i=0; i<numKeys; i++) {
// if it was pressed...
if (trellis.justPressed(i)) {
Serial.print("v"); Serial.println(i);
// Alternate the LED
if (trellis.isLED(i))
trellis.clrLED(i);
else
trellis.setLED(i);
}
}
// tell the trellis to set the LEDs we requested
trellis.writeDisplay();
}
}
}
Introducing Adafruit Trellis
So…with those changes in mind…here’s a link to the starter guide:
Introducing Adafruit Trellis
Don’t continue with the UNTZtrument guide until you have a tested and working 8x8 or 16x8 Trellis.
Troubleshooting
Some of the LEDs don’t light up!
- If the positions are somewhat random: some LEDs might have been installed backwards, or might’ve been damaged from excessive heat. Happens all the time, not to worry. This is why we include lots of spares. De-solder the problem LEDs and clean up the holes using a solder sucker, then replace them with new ones (in the correct orientation).
- If it’s a complete quadrant of the 8x8 Trellis, the address jumpers on the back of the board might be improperly set. Refer to the diagram above.
None of the LEDs light up!
Might be the wiring. The Arduino Leonardo requires the use of different pins when communicating with the Trellis boards, or you might just have the wires swapped. Refer to the diagram above.
The wires keep snapping off the board!
Wires shearing off are usually due to cold solder joints, where the solder has not fully wetted the pad and flowed smoothly between the pad and wire. Make sure you’re fully heating the pad and wire first before adding solder…do not melt solder on the tip of the iron and then carry it to the wire, that’s a recipe for failure.
I can’t fit the wires into the Arduino sockets!
It’s a little easier to build UNTZtrument with solid-core wire (it slides right into the Arduino headers), but sometimes stranded is all you’ve got. Too-fat wires can happen if you’ve tinned the tip of a stranded wire with excessive solder…